This tutorial is another way of doing Mosaic Crochet. I am calling this the OVERLAY Mosaic Crochet because this method employs the main characteristics found in Overlay Crochet: namely, working in the BLO (back loop only) and dropping down to pick up the front loop of stitches in lower rows.

And thanks to a comment by chipnanna (Feedback on CMC Tutorial), let me just state explicitly: this Overlay Mosaic Crochet method does not use the chain-spaces employed in my earlier mosaic crochet tutorial (which I have now named the Chain-Sp Mosaic Crochet {see Mosaic Crochet Overview – the Different Methods, for a fuller explanation}).
I didn’t “create” this method but I am assigning the name, “Overlay Mosaic Crochet (OMC)” as a clear and easy way to refer to this and differentiate from the first method I documented before.
How to do Overlay Mosaic Crochet
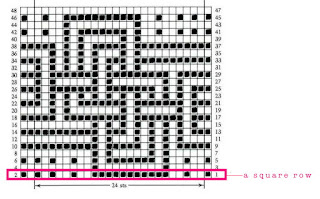
Let’s use this Barbara Walker’s chart again.

Even tho it is usually not shown on the chart, we always start off with one foundation row of sc (single crochet).
Here I will be using:
• black square = Dusky Pink yarn
• white square = Pale Pink yarn
• R1 & all odd rows (RS) – read from right to left (R=>L)
• R2 & all even rows (WS) – read from left to right (L=>R)
Then for the next sq-row (e.g. R3&R4), you read/crochet the row from R=>L, then the next row from L=>R – in the next colour.
The right-most square of each row of squares on the graph, identifies the colour you will be working with.
Reading the Sq-Rows
• When we pick up stitches from lower rows, we always crochet into the Front Loop only.
Let’s start reading the chart. Starting at the bottom-right of the chart.
Black Sq-Row (R1&2):
EXCEPTION! The first Sq-Row is going to be different from other rows. If this is going to be a black sq-row, then crochet the 2 rows in [sc in BLO]. (Yes, work in the back look only for both R1&R2).
R1&2: [sc BLO]
Don’t worry that R1 & R2 looks nothing like the graph right now. The magic is coming …!
On a White Row: when you see ..
• White col. sq over Black col. sq (W/B), you will [sc BLO]
• B/B ==> [sc BLO]
• W/W ==> [dc FLO] (front loop only) into corresponding stitch, 2 rows down
On a Black Row: when you see ..
• B/W ==> [sc BLO]
• W/W ==> [sc BLO]
• B/B ==> [dc FLO] (front loop only) into corresponding stitch, 2 rows down
White Sq-Row (R3&4):
R3: In a White row on the chart, you will only [dc flo], directly two rows down (i.e. here it will be into R1) when you read W/W.
Otherwise, [sc blo] all other stitches.
Notes on General Mosaic Crochet
- In case you haven’t already realised, the reason why each sq-row is made up of 2 rows of crochet, per colour, is so that the colour can go one way and come back again, ready for you to pick up the second colour. This is true for flat crochet (where you go back and forth).
- In circular crochet, you only need one row per colour. That is because at the end of one row, you are back to where the other colour is waiting for you. This is very convenient for circular crochet and the graphed patterns will turn out more compact.
- Compact Mosaic Crochet: If you are working in flat crochet, to decrease the height of your Mosaic Crochet and to create a more compact pattern, you [sl.st BLO] in every Even row (rather than [sc blo] as we showed here.


