Using wire netting to bezel a cabochon is what I wanted to learn. Here are the first couple of results. I watched a very useful basic video Wire Weave Cabochon Bezel Tutorial by Camille Sharon (see vid towards end part of this article) on YouTube. Even though she was teaching the Viking Weave, she also covered wire netting towards the end.

In my attempts here, I made use of the basic principles but added a few things like starting from the front and adding beads as I weaved the wire. I have also included tips as to how to get the wire netting more snug, neat, and regular.
This pic shows my first attempt. Quite happy with it too! The thicker wire is randomly curved and wrapped and will be the “anchor” on which to begin the wire netting.
In this instance, I actually strung (clear) Japanese seed beads onto the thicker wire (about 0.7mm) and then made the end-loops to finish off the piece of wire.
First curve the wire to approximate size of cabochon, >> make one end loop >> string the beads >> make other end-loop >> and adjust the wire so that it sits nicely on the cab and yet is smaller then its diameter.
For the rest of the wire netting, I strung 2 beads for every single weave.
The next 2 pics show the side-view of the finished bezelled cabochon done with wire netting. (I have used a glass cabochon – one of those that you can easily get from a $2-Dollar store). The beads along the thicker wire also helped in regulating the spacing of the wire netting.
As you end off a wire weave cab, your stitches should get smaller and tighter so that it will clinch and hold the cab. Here not only have I done that, but for the very last (1-2) rows, I have just sewn through the last wire net scallops and pulled tight so that it would provide a strong and final clinch and will yield a much nicer finish.
Well that was my first attempt and I was hooked. However the above has not been made into any finished product. Rather I have added it to my handmade components box and it will probably resurface some day in some mix media art work or something 🙂
Wire Netting an Opal Necklace
This next attempt is my wire netted synthetic opal coin bead. Admittedly this is not a cabochon but the wire netting principles employed are the same.

TIP:
Wire gets harder the springier the more it is handled. The more that happens, the harder it is to weave – the ends of the wire will spring back at you making it both dangerous and difficult. Wire weaving feels very much like sewing. However it is best to resist the natural temptation to slide your fingers along the wire to get to its end (as you would with sewing thread). Rather find the end of the wire and as much as possible, try to avoid sliding your fingers along the wire with each weave. The wire will still get harder and springier as you work but you will want to minimize that as much as possible.
Carry on a few rows of wire netting. Check against the cabochon (bead or cabochon) as you go so you know how many rows of wire netting you require.
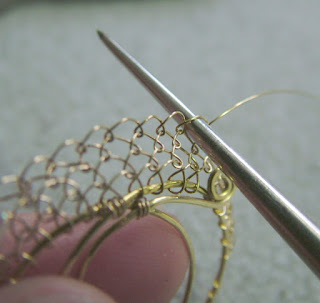
Some close up pics on how to do Wire Netting
Tip:
The direction you pull the wire will greatly influence the tightness of the wrapped loop and more importantly, the neatness of your curves. The photos below show the direction to pull to produce the smoothest curves.
Another very needfully useful tip is to use a round prick (not of the human kind of course!) or mandrel of some kind to round out and regularize each weave as you work.
Here I have used resin petals, Swarovski (2.5mm) clear crystals and wire looped cat eye beads on round head brass head pins.
Only after the bead is fully encased in the wire netting do I add the large fancy headed brass head pin and wire wrap a loop at the other end as a bail.
The following are just multiple shots of the finished wire netted opal pendant necklace. I have used engraved wooden beads (sanded, buffed, and finished with light gold wax finish) and complementary cat eye beads (4mm) on either side of the pendant.
The translucency of the bead allows the fine wire work to show through.
Additional Notes
BeadSmith's Screw Crimp Bead
This next pic shows my first use of BeadSmith’s screw crimp beads. That’s another story for another day but I must say here I am so impressed with them. I love the secure feel of them and the professional finish they provide. The stringing material is also by BeadSmith – Flex Rite 49 strand nylon-coated stainless steel (0.45mm dia) – which is fine yet strong and flexible.

Where I learnt how to Wire Net a Cabochon
Wire Weave Cabochon Bezel Tutorial by Camille Sharon. Here she shows how to do the Viking Weave around a cab. And it is only towards the very end that she covers wire net weaving. Both methods are equally interesting and instructive.


