The main aim of this Mosaic Crochet overview is to clear up some persistent confusion I have noticed in crochet groups and discussions regarding the different ways of making mosaic crochet.

I wrote my first article of Mosaic Crochet (MC) in April of 2017. At that time, I had a hard time finding any reference articles or how-to tutorials on Mosaic Crochet. So I had to cobble together what I could and through trial and error, work out how to do Mosaic Crochet. Since then, Mosaic Crochet seems to have magically exploded on the internet – spawning dedicated Facebook groups, YouTube videos, and specialist divisions in various forums. And with that spread in use and popularity, Mosaic Crochet has also sprouted confusion as it evolved.
Here, I hope to clear some of that confusion by:
- going through and summarily explaining the differences among the various Mosaic Crochet techniques
- showing their resultant differences via a comparison of crocheted samples
- clarifying the names (at least for myself) that people have had to resort to in trying to differentiate amongst the various MC techniques
This is not a definitive guide. Mosaic Crochet will, I am sure, keep on evolving. This article is specifically directed towards someone who is already familiar with MC in one form or other, and is trying to grapple with the differences in techniques.
Origins: Mosaic Crochet
Mosaic Crochet was so named because it is a crochet adaptation of Mosaic Knitting. And many of the original translations from Mosaic Knitting to Mosaic Crochet utilised a set of mosaic knitting patterns from the famous book by Barbara Walker. In fact, Barbara Walker is the first person to coin the term, “Mosaic Knitting”

Evolution of Mosaic Crochet
Mosaic Crochet has definitely evolved. My own chronological list of related articles has also unintentionally become a reflection of this evolution.
- Mosaic Knitting Basics – a brief introduction into what it is and how to do Mosaic Knitting
- What is Mosaic Crochet – in the early days when I wrote this, this was more about what I thought Mosaic Crochet was not. At that time (2017), according to Google, the person most associated with Mosaic Crochet seemed to be Lily Chin. I even bought her set of DVDs in desperation to learn more. But while I will include her method in our discussion here, I still don’t really considere her method, while interesting, to be really pure Mosaic Crochet. (I have named her method the Drop-Stitch Mosaic Crochet but is probably better named as Spike Mosaic Crochet because of the type of crochet stitches used.)
- Mosaic Knitting vs Mosaic Crochet – just a quick look at the differences between the knitting vs crochet version.

- Mosaic Crochet, How To – my first tutorial on mosaic crochet. While still valid, it is no longer my favourite method. More explanation below. (I now called this method the Chain-Space Mosaic Crochet.)
- Mosaic Crochet: How to do Overlay Mosaic Crochet – my most recent photo tutorial on Mosaic Crochet and an upgraded method to the previous tutorial. And why I named this upgraded method the Overlay Mosaic Crochet (OMC)
- How to do the Clean Mosaic Crochet (created and added, Sept 2020)


How to Name the Various Mosaic Crochet Techniques
I shall list them in the order that I learnt them. I don’t know if these are the naming conventions that others are using or will use but I will explain why I choose to name them as I do.
The Different Mosaic Crochet techniques:
- Spike MC or Drop Stitch MC
- Chain-Space MC
- Overlay MC
- Clean Mosaic Crochet (CMC) (Added: 16 Sep 2020)
I often see the confusion on Facebook and other places as to how to refer to a method, what their proper names are, and what are the specific differences in techniques and results. Two core reasons for that confusion are:
1) Mosaic Crochet is still relatively new and there is no long-term, universally accepted labels or names for each of these methods
2) worse, people often name something and others try to remember what it is called by sheer dint of memory alone. That only works for a short time but will often be forgotten in the longer term.
1) Drop Stitch or Spike Mosaic Crochet
I really won’t go into a lengthy tutorial-type explanation of how to use this method as espoused by Lily Chin. Her DVD is available on Amazon and I have done a mini review of it in What is Mosaic Crochet.
Basically to produce her “mosaic” patterns, she employs drop stitches aka spike stitches. For example, to work a drop-dc (drop double crochet): instead of working into the next st (of prev. row), the dc is worked into the row(s) before the previous row; working front to back through the work.
And so, I call this the Drop Stitch Mosaic Crochet or the Spike Mosaic Crochet.
2) Chain-Space Mosaic Crochet
This is the method I first figured out and used. My first tutorial, Mosaic Crochet – How To, provides a detailed step-by-step instruction on how to do this and how to read the mosaic pattern chart. This method uses the chain stitches – producing chain spaces – to bypass the non-active colour; hence why I named this method the Ch-Sp Mosaic Crochet.
For example, on a white row using a white yarn, instead of working into the next stitch, you will make the appropriate number of chains when you come to a black square(s) on the chart. Then in the following (black) row with the black yarn, you will work your stitch over the chain-spaces from the previous row.
While no longer my favourite MC method, this method is still used in some patterns. There is a free, popular and famous pattern (Nya Mosaic Blanket) by the very talented Tatsiana from the LillaBjorn’s Crochet World site. There she employs this Ch-Sp Mosaic Crochet technique, showing clear, detailed steps.
Overlay Mosaic Crochet
Overtaken by CMC below!
I named this method thus because it employs the very stitches predominantly used in Overlay Crochet. Two outstanding features in the Overlay Crochet method are:
- all stitches (unless otherwise stated) is worked in BLO (back loop only). This leaves the front loop of the stitches available for use to future rows
- stitches in later rows are dropped down to previous rows and the available front-loops are picked up and crocheted. In other words, to create the patterns in Overlay Crochet, stitches are overlaid over other stitches – hence its name.
And so in Overlay Mosaic Crochet:
- all stitches (unless otherwise stated) are worked in BLO
- and to form the mosaic patterns, we overlay stitches or drop-stitches over those in previous rows, and work into their front loops.
How to do Overlay Mosaic Crochet provides a step-by-step detailed tutorial, including how to read the mosaic pattern chart.
3) Clean Mosaic Crochet (CMC)
I think that the mosaic crochet designs by Tinna Thorudottir Thorvaldar are just marvellous. And this technique, I believe, just makes them even easier and more enjoyable – because you don’t need to cut the yarn at the end of every row.
This technique is my new addition as of mid Sept, 2020. I have already made a pocket scarf using this method and a number of samples so I know how doable this is. And it is faster, easier, much more enjoyable, and cleaner – there are no hideous cut yarn you have to hide or deal with in some way. And this is does no require you to work two rows for each colour either.
I named this the Clean Mosaic Crochet because:
- it is clean because there are no tedious cut yarn at the end of every row; no need to hide or deal with the endless cut yarns at the end of a lengthy project
- it is clean because we do away with having to do 2-rows for every colour. Each row (of squares) on the MC (mosaic crochet) graph represents 1 row of each colour
- it is clean because we also do away with the unsightly edges where you can see the colours being brought up along the edges (which is what happens in the 2-rows methods)
You can find out how to use the Clean Mosaic Crochet via a tutorial I set up: Clean Mosaic Crochet Tutorial (CMC)
But “WAIT A MINUTE”… I hear you shout, scratching you head …. what about ….
Overlay Mosaic Crochet vs Inset Mosaic Crochet
Now these 2 recent terms are getting to be used more and more in various crochet groups. And yet, it is still confusing to many – because it is hard to remember why they are so named! This is what I meant earlier about having to try to remember technique names based not on logic, but sheer memory alone.
I only recently realised that these labels were being used and with the best of intentions, people are trying to explain it to others so that these techniques can be easily referred to and understood amongst us crocheters and those wishing to learn Mosaic Crochet. But personally, I don’t find the names very useful names in helping us understand and remember the differences.
In a nutshell, I have noticed in discussion groups and Facebook groups that crocheters are referring to these two Mosaic Crochet names mainly based on whether the mosaic patterns are worked over one or two rows and whether the yarn has to be cut at the end of every row. While the mechanics are not inaccurate, it is not a helpful way to understand, remember, and call to mind the names and differences amongst the differing mosaic crochet techniques. Generally, the crocheters seem to be bravely trying to differentiate and remember the technique names based on the following unhelpful definitions/explanations:
👎🏼 Overlay Crochet: that it is a 1-row mosaic crochet method, and yarn is cut at the end of every row. The cut ends will be dealt with later, usually by employing a double layer border.
👎🏼 Inset Mosaic Crochet: that this is a 2-row method and there are no cut ends.
Reason Why to name it Overlay Mosaic Crochet
I do agree that the method that Tinna employs is (and should be) called Overlay Mosaic Crochet – but NOT because you only work with RS facing you NOR because you cut the yarn at the end of each row. That would not explain why you would even call this OVERLAY mosaic crochet, would it?!!!!!
Rather it is as I explained above, I call this Overlay Mosaic Crochet because it uses the same core techniques as Overlay Crochet:
• working into BLOs, and
• overlaying stitches over previous rows and into their front loops.
Now it is very important AND useful to understand that Mosaic Crochet does not have to be worked in one row only or over two rows. This will become clearer in the next section….
Reason why Not to name it Inset Mosaic Crochet
Look again at the shaky definition above. The reason why I don’t care for this name is it makes no intuitive sense why this should be called “INSET”. Just because it is worked over 2 rows? Or that it involves chain-spaces??
~ Oxford Languages dictionary ~
I have chosen to name this method Chain-Space Mosaic Crochet because it uses chain-spaces to achieve the desired mosaic patterns; NOT because it is worked over 2 rows.
One vs Two Row Mosaic Crochet Is Not the Defining Factor
Mosaic Crochet can be worked over one or two rows! Yes it can!
I can and have worked both the Overlay Mosaic Crochet and the Chain-Sp Mosaic crochet over one row and also over two rows.
But Why work over 2 rows at all?
The only reason why Mosaic Crochet was originally taught over 2 rows (just like in Mosaic Knitting), is so that the colour you are working with will end up on the RHS (right hand side) when the RS of the work is facing you and you can then immediately pick up the next colour (It is the RS of the work that produces the mosaic pattern, as per the chart you are working off.)
And that is also the reason why, in Tinna Thorvaldar’s mosaic crochet, she cuts off the yarn at the end of every row: – just so she can start each row, RS facing you, with the yarn on the RHS!!!
And while she produces very beautiful pieces indeed, I don’t care to have those endless cut ends at the end of every row and then having to work a double layered border just to cover them up. Yes it is beautiful but that double border eats up a lot of yarn, is very time consuming, boring to do, and most of all (to me) very limiting where flexibility of shape and structure is concerned, e.g. pretty hard to have to deal with a border if one is thinking of using mosaic crochet to make a jacket for instance.
The biggest disadvantage with Tinna’s method is having unsightly cut yarn at the end of every row.
The biggest disadvantage of working Mosaic Crochet over 2 rows is it usually elongates your pattern.
Now wouldn’t it be great to not end up with an elongated pattern and not to have those unsightly ends to cover up? There are 2 main situations where you can do exactly that.
Working in the Round
When you are crocheting in the round, your working yarn will naturally end at the start of the row, where you can easily switch to the other colour. So in circular crochet (tube or flat), you don’t have to work 2 rows per charted sq-row nor do you have to cut your yarn at the end of every row.
See sample #3 in comparison images below.
Working Flat Pieces
For flat pieces like blankets, where you normally work to and fro, we must employ another method so that our patterns are not elongated yet we don’t have to cut the yarn at every row.
Please see samples #4 and #5 in the comparison table and images below. Both of them are worked flat in Overlay Mosaic Crochet yet requires no cutting of yarn at the end of each row, and the pattern is not elongated.
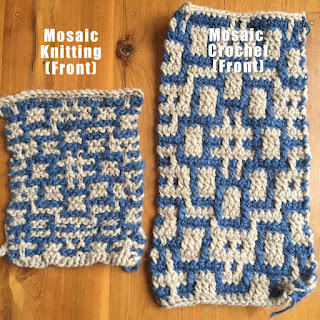
Visual Differences of the Different Mosaic Crochet Techniques
I will leave you now with samples of work, in the various techniques so you can see their differences.
Shown below are samples produced in various MC techniques, using the same mosaic pattern, yarn, and hook size. Included are the RS and WS.
#1 Drop-Stitch MC: worked over 2 rows. The only technique where the WS is not striped but more like a reverse image.
#2: Chain-Space MC:
• worked flat, over 2 rows
• elongated pattern, about same length as #1
• back is striped
#3 Overlay MC, tubular/circular, over 1 row (I worked over 40stitches)
• not elongated; no need to cut yarn at end of each row
• striped WS
#4 Overlay MC: flat over 2 rows where
• R1 uses sc & dc stitches, and
• R2 uses sl st.
All worked in BLO except for the dc overlay stitches.
#5 Overlay MC: flat over 2 rows where
• R1 uses sl st & dc stitches, and
• R2 uses sl st.
All worked in BLO except for the dc overlay stitches.


Addendum (July 2021): I created the Clean Mosaic Crochet (CMC) – Explanation & Tutorial after this article was written and hence, it is not included in the comparative samples below. So I will just include a Front and Back view of a CMC sample, based on the same graph pattern.


That is it for now. I hope this is of some use to someone. It sure has been exhausting!!! 🥱