I call this the Clean Mosaic Crochet method because it is truly clean in a number of important ways. We do away with the pesky cut yarns at the end of every row that is typical in the overlay mosaic crochet method. We do away with the boring second row in the 2-row Chain-Space MC method (also known in places as the Inset method). And as a added bonus, we can have a clean border edging: you won’t see the yarns being caught and brought up along the edges.

BENEFITS OF CLEAN MOSAIC CROCHET
- 1 row per colour
- NO TAILS – no need to start and cut the yarn for every row
- SAVE TIME & YARN – no need for double layered borders or other means of dealing with yarn tails
- NO UNSIGHTLY EDGES – no need to carry up unsightly yarn along one edge as in the 2-row method. (Chain-Sp Method aka Inset Method)
- AUTOMATIC BORDERS – create neat borders (of any width) along sides as you work; all of a piece
Clarifying Notes" CMC Terms & Definitions
You can jump to the download (and print) the Clean Mosaic Crochet - Terms and Definitions.pdf file on those notes. Even though the .pdf is kinda rough and ready, it will still make it easier for you to follow along during the tutorial. Or you can just jump to the clarifying notes (at the bottom of this page).
TUTORIAL: Clean Mosaic Crochet Tutorial
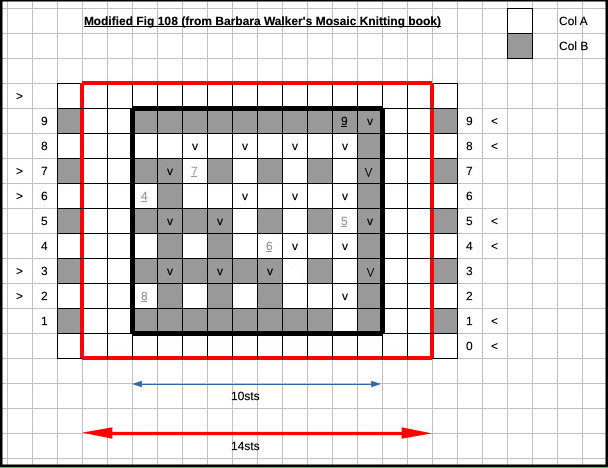
Please refer to the graphed/charted pattern as we go.
Per example:
colA = white
colB = red
Insert a marker into the last loop to prevent it from unravelling. You started on the RE (right edge); ended on LE (left edge).

• R1/col B (RS):
Start col.B. Start on RE, 2 stitches in.
10sc. Leave loop on another marker.
Yup. You will only work col.B within the Black Box (or repeating pattern) of the chart; it will not be part of the “borders”. This is how we avoid having to carry up the inactive yarn colour along the edges.


• R2/A (WS):
Note: WS will be facing you.
Work left to right, according to chart.
Place all non-working yarn to WS of work.
Start & end with 2dc for borders.
Remember that all sc are work in BL as defined above. “Front loops are sacrosanct!”
Opt. You don’t have to but I work all my border in LDC (Linked DC)
Updated: 18 Nov 2020
As we are working with WS of work facing you, I want you to take particular note on this trick of how to work a ddc from the WS but applying it to the RS of work.


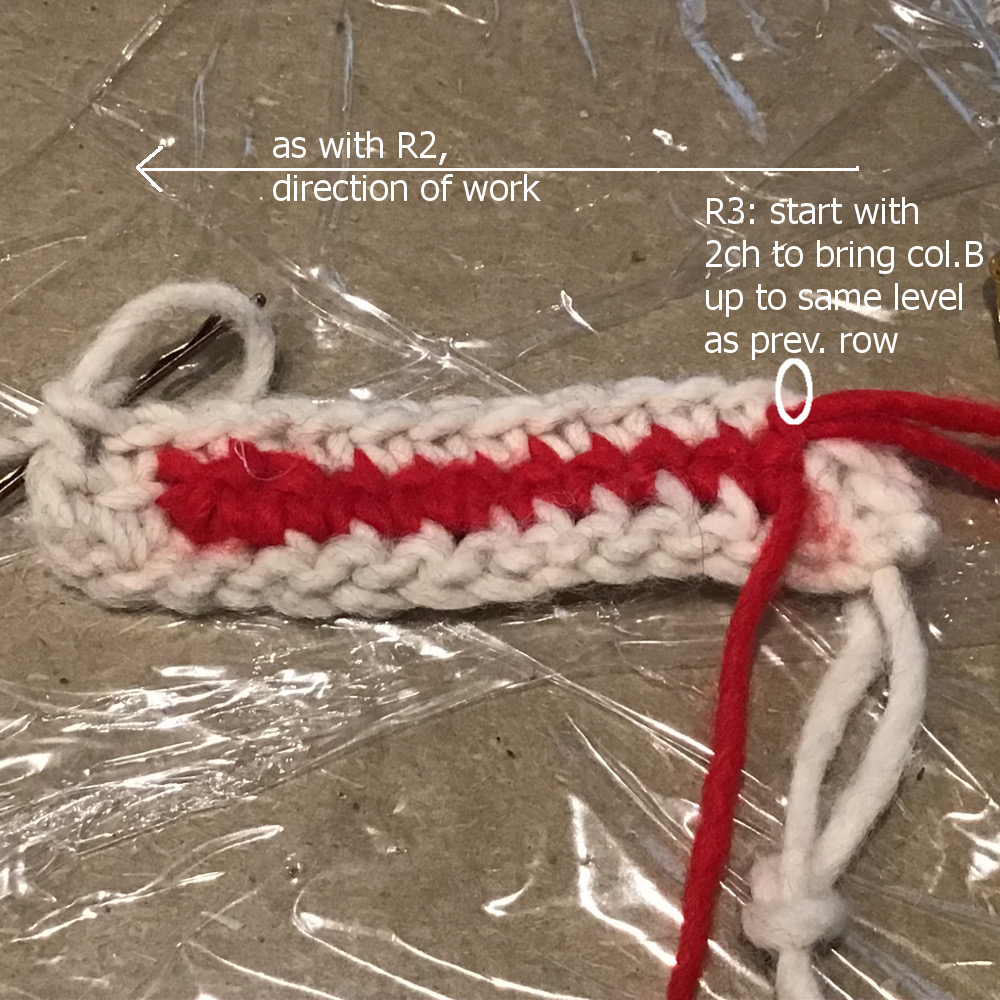
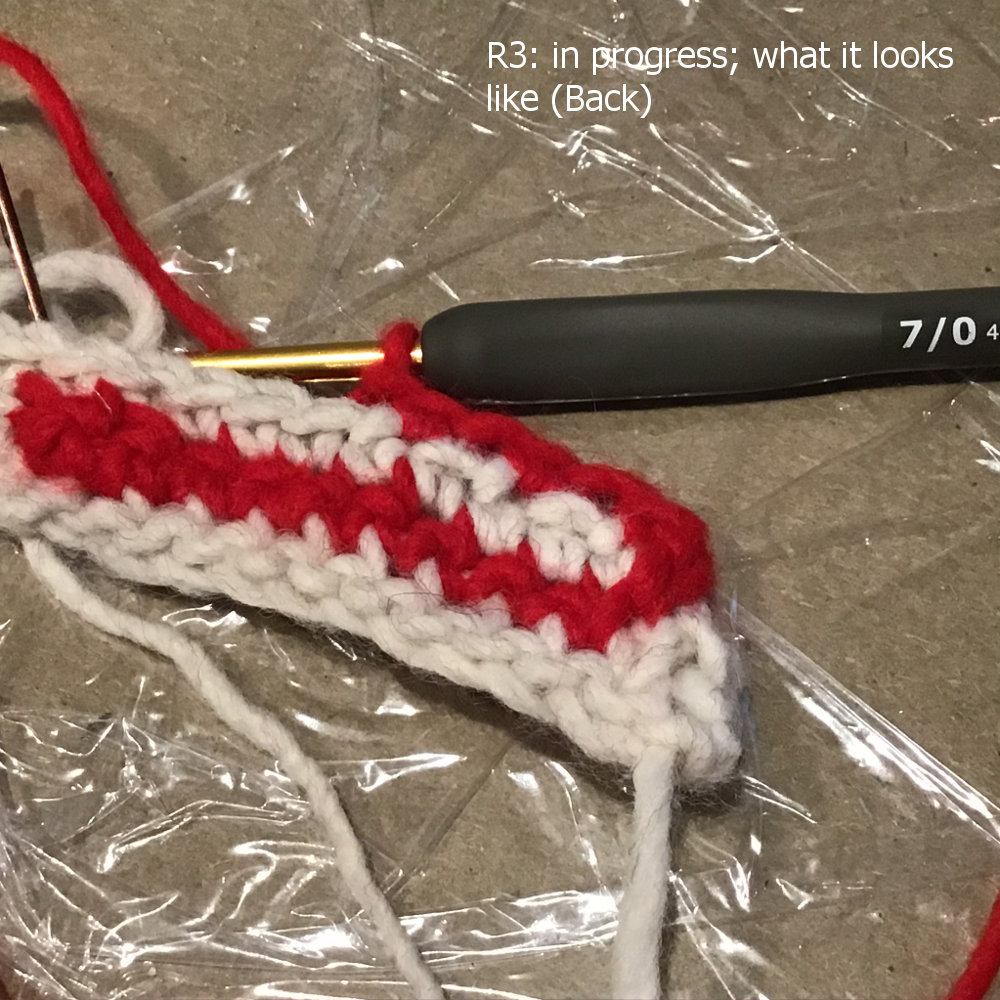
• R3/B (WS): (1sc, 1ddc) x3, 3sc, 1ddc
(Note: we are still working in the same direction as the previous row: LE to RE.
Note also that col B is lower than previous row. And that, in this colour, we do not have to do the border. To bring this up to same level, always start B with 2 chains.)
Here are the photos showing parts of R3. Remember that we will be using the same trick of working ddc into the RS of the work from the WS, as detailed above.


Addendum (18 Nov 2020)
In the next 2 rows (R4 & R5), we will be working with RS facing you.
Pay particular attention to the trick of how to work a ddc from RS. This is different from normal. I have added this trick to ensure that there are no floppy strips on the WS of the work.
Keep in mind you work col. A then col.B in one direction,
then col.A followed by col.B in the other direction,
as per indicated in the chart.

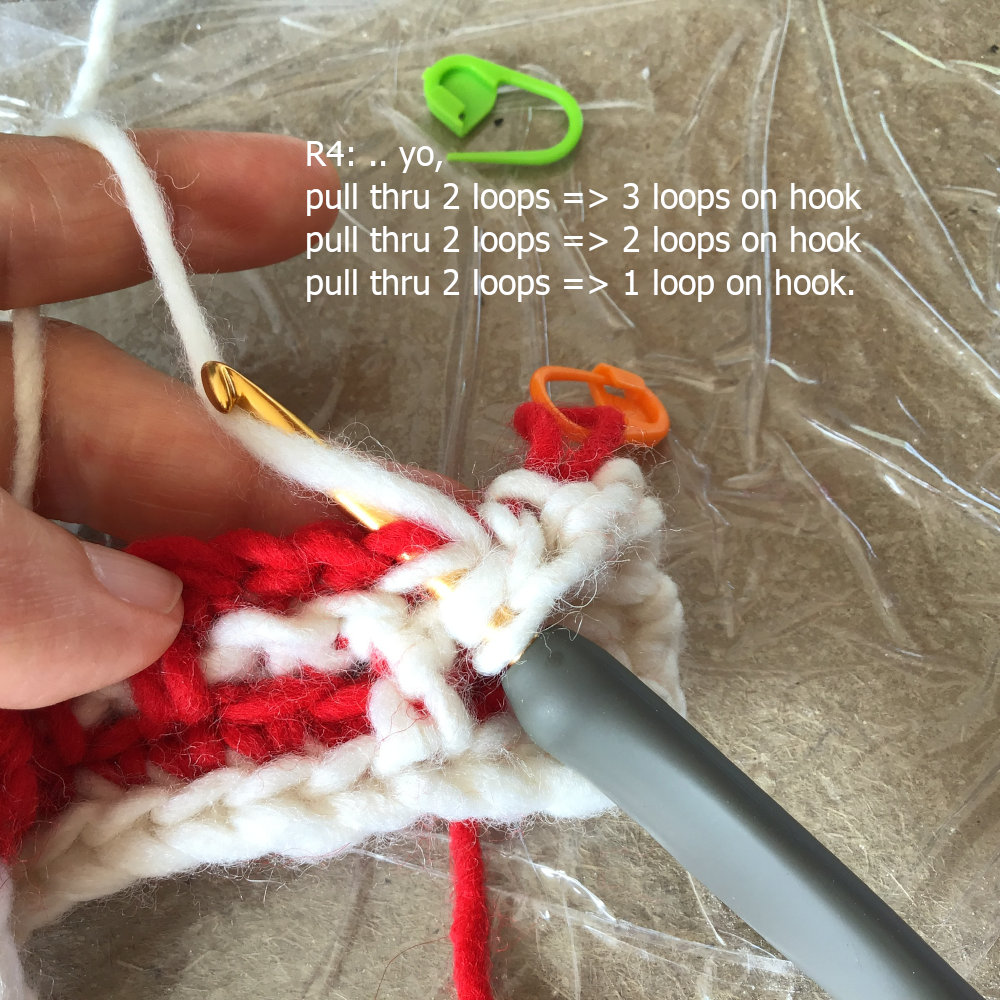
• R4/A (RS):
2dc, (1sc, 1ddc)x2, 6sc, 2dc


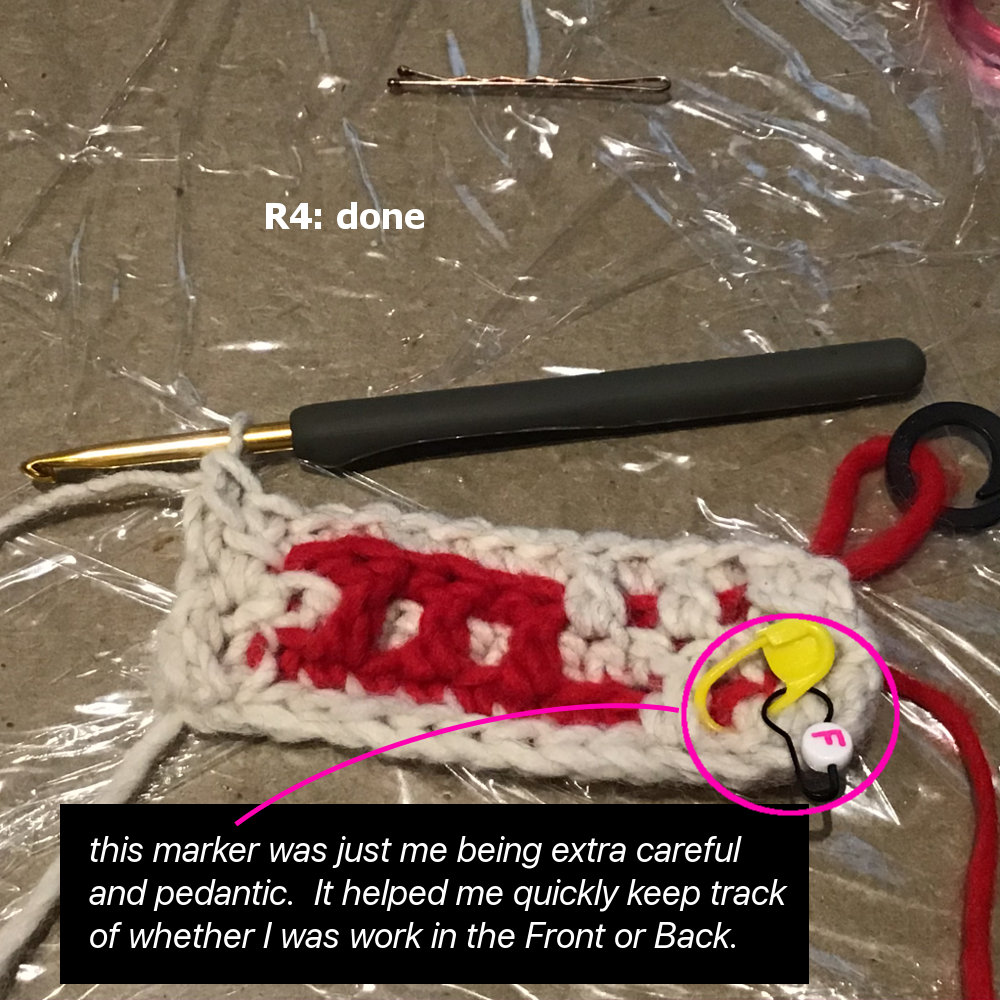


Even though I have not tidied up the final ending yarns (and the starting tail), from this small sample, you can already experience for yourself that:
- it is clean – i.e. no pesky cut yarns at the end of every row
- every row counts in forming the mosaic pattern
- and no untidy inactive yarn that has to be caught and carried up along one of the edges
If you found working this method a bit tedious, then I have to agree. I found that too. But only in the beginning. You will quickly acclimatise and I hope that, like me, you will find this Clean Mosaic Crochet method easy and fun to use for any mosaic charted patterns.
Another Sample of CMC
This larger sample shown here is also worked in CMC method. You may recognise it as this is from the famous (free) Nya Mosaic Blanket, designed by the talented Tatsiana of LillaBjorn’s Crochet World site. She used the Chain-Space MC method (aka Inset MC method) – utilising the 2-row routine.
Permission: Tatiana Kupryjanchyk, owner and designer of LillaBjorn’s Crochet World has given her kind permission for the use of her Nya mosaic chart, as shown here.
I just want to show that that same mosaic pattern can as easily, if not more so, be worked using this new CMC method. Here I worked only a 1-stitch seam/border on both sides. I have only modified LillaBjorn’s Nya charted pattern slightly for this illustration. You can also use the modified chart here for further practice with the CMC method if you want to.


CMC: Terms & Conventions Used
I will be using what will initially seem to be some tricky manoeuvre. So to ensure we don’t get confused and that I can explain all this as succinctly as possible, I will define some conventions I will be using consistently henceforth.
Let’s recap….

MC Graphs/Charts
They normally look like this and the pattern is charted in square-rows
Right Side (RS) vs Wrong Side (WS)
There is usually a distinct Right Side (RS) and Wrong Side (WS) to your work. The RS corresponds to what you see on the chart; the WS normally looks like stripes of alternating colour.
Fixed Right Edge (RE) vs Left Edge (LE)
To minimise confusion, with the RS facing you, I will refer to the right edge as the Right Edge (RE). For our work, this will not change. That means that even when you turn the work so that the WS faces you, I will still denote RE as the right edge when the work was facing Front-up.
Similarly, LE (Left Edge) will always refer to the edge of the work that is to the left when the work RS was facing you.
Fixed Front Loop (FL) vs Back Loop (BL)
If you are already familiar with the popular Overlay Mosaic Crochet, you will remember that we always work sc (single crochet; US terminology) in BLO (back loop only).
Generally, what is front loop or back loop depends on whether the RS or the WS of work is facing you. That can get very confusing. The distinction between front loop and back loop will become particularly important here so I will define what I mean very clearly.
Back Loop (BL)
for our purposes, Back Loop (BL) refers only to the back loop of stitches when the RS of work is facing you. That means that even when you turn the work around and the WS faces you, BL will still mean the same back loop of stitches when the RS of work was facing you.
Front Loop (FL)
similarly, FL means the front loop of stitches when the RS of work is facing you. This will be fixed – FL is the front loop of stitches wrt to RS of work facing up.
And as a helpful work mnemonic, keep in mind that:
Work all SC (single crochet) in BLO, unless otherwise stated.
You never work sc into FLs. You need to keep them free so that stitches can be overlaid over stitches and worked/dropped into the FLs to form the Mosaic Crochet patterns.
Recap: Chain-Space Mosaic Crochet (aka Inset MC) Method
In this method, each charted sq-row usually requires you to crochet each yarn colour for 2 rows (to and fro). So that the yarn starts and ends on the RE of the work. This is usually a waste of time and yarn where the creation of the designed-pattern is concerned.
Recap: Overlay Mosaic Crochet Method
Tho it is not true (as I explained in Mosaic Crochet- the Differenct Methods), many people think that with this Overlay MC method, while they can work each charted sq-row with just one pass of each colour, they have to cut the yarn at the end of the row – leaving them with a lot of cut ends to be dealt with at the end of the work. Again the only reason why the yarn is cut is so that we can start each colour on the RE, with RS facing up.
Now let’s jump into our CMC tutorial so I can show you how you can just achieve the benefits of CMC.
Clean Mosaic Crochet – How to Read the Chart
 To be consistent, we will use this mosaic chart that I alreadty used for the various samples in Overview of Mosaic Crochet – the Differences.
But I will make some further clarifying notations for our CMC method.

Ok Ok! Before you moan and groan and turn away from a deceptively complex illustration, just spare a moment to think about me and what I had to do to put this together for you!!! And let me assure you, for you, it will be all quite simple – I just crammed a lot of info here. But once you get it, it will be easy peasy!
With reference to the graphed mosaic pattern above:
• each colour represents 1 row of the chart
colA/colB: in CMC, as in all mosaic crochet, you work with 2 colours at any one time even though you can change what colour(s) colA and/or colB represents at different places in your work.
Inner & Outer Yarn: in CMC, one of these two colours is also assigned as an outer yarn and the other as inner yarn. The inner yarn is never worked right to the edge. The outer yarn extends past where the inner yarn stops; the border is worked in the outer yarn colour.
Borders (represented by the yellow section on the sides in this example): The border is worked with the “outer yarn” which is worked to the full width of the work. You can decide which of the two colours will be your border. Or the pattern in hand may determine that. The very first row (Row 0) will usually also be the border colour.
Row 0 (Foundation Row): If you are starting your work with my favourite cast on (the MM Cast On), then cast on and Row 0 are one and the same. If you are using the conventional cast on with specified number of stitches, then Row 0 = 1 row of sc (single crochet).
2ch up: for every row that starts with an “inner” yarn, remember to make 2ch to bring it up to level with previous row
Black Box: the repeating mosaic pattern is encapsulated within the black box.
Outer Box (red in this example): total work area, including borders on each side. (Borders can be any width. In this graph example, it is 2 stitches per side.) One of your 2 colours (the “outer yarn”) will form the borders and will be worked the full width of the outer box.
Inner Box (black in this example): patterned area, excluding borders.
Coincidentally in this example, the Inner Box = Black Box.
On Graph: Alternating Coloured Squares Along the Sides (next tot he row numbers): indicate the active yarn colour you will be working with, row by row. (This is a standard Mosaic Knitting&Crochet graphed-pattern convention.)
Left/Right Arrows ( < and > ): when I chart out a pattern, I often add the left/right arrows along the edges to indicate direction of reading and working for that row. The arrows are not an essential part of a Mosaic Crochet chart but are very helpful.
normally apply the following rule of thumb:
> is when the WS of the work is facing you, and you read the graph from left to right.
== with RS facing you:crochet one row of Col A from RE to left. Then you..
crochet one row of Col B from RE to left.Followed by …
== with WS facing you:crochet one row of Col A from LE to right. Then you..
crochet one row of Col B from LE to right.And so on.
Numbers in the squares: they are numeric counts (e.g 31sc, or 7v) which is entered in the the first square of a span of squares along a row, in the direction of read/work (border stitches are NOT included in this count).
“V”: This is used to indicate ddc (dropped dc). This is another aid to help make reading the MC charts easier.
See, that wasn’t too hard, was it? Now that you know how to read the CMC charts, let’s dive into our tutorial.
Feedback?
There was surprising quite a lot of feedback on this blog post. I was amazed because this is a very long post. But people can be truly incredible and humbling.Anyway, I have moved platforms since the first publication of this post. Unfortunately, there was no easy nor automatic way to transfer those feedback and comments here.
However the feedback is often useful to other readers. Hence I have manually copied and posted them here: Feedback & Comments on CMC Tutorial.