How to make a solid (rigid) double layered Square in RAW (right angle weave) stitch? The first photo shows some samples. They are just for reference and as you can see, I have not tidied up all the threads yet.
This actually is a very delightful shape - it is crisp and solid and can be used in a ring, as a pendant, or any anyway your creativity takes you. I did make some of these some years ago but for the life of me, I could not remember how it was done. I had found some illustrated instructions in a Japanese beading book, and I followed along. At that stage, I had never even heard of the term "RAW" or "right angled weave". Without the book, there was no way I could reproduce these little delights.
However in a moment I will let you know a little secret and how I now have the (probable) ability to reproduce this at will without the initial instructions book ...
 |
| Solid Beaded Square - double layered - in RAW |
What is the importance of knowing Beading Terms?
Like how does it help to know that this is made in RAW?
Beading terms are like labels - like names are labels. If you know a John, then as soon as you think of John, you not only think of the 4 letters that make up the name but a whole series of associations will occur in your mind - emotional, maybe even audio, and almost definitely visual.
Similarly, when you know the beading terms (e.g. RAW) and you know the basic structure of the stitch, as soon as you think of RAW, you will most likely be able to see in your mind, the structure (basic configuration) of the weave ... and how it is put together.
This is important because instead of having to follow blindly written or even illustrated instructions, you can begin to see patterns or repeats of the particular beading weave and you can mentally understand, construct, and remember how some structure is put together.
Let me show you the original instructions in the book:
 |
| original japanese instructions |
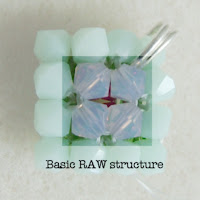
Next is the basic configuration of a RAW stitch, no matter what beads you use:
It is a "square" made up of (at its most basic) 4 beads. As you look at the 2 pics above, you can see how the repeating pattern of this RAW 4-bead square makes up the final shape.
So that is what I did in this beading tutorial - identified these repeating RAW patterns so that I could understand, see, and remember this in my mind and hopefully I will be able to clearly explain this to you.
Once I saw this repeating RAW pattern, I could actually modify the original Japanese instructions because I understood how the construct was achieved and so could put it together in what I feel is a much simpler way.
Deconstructing the original pattern and Creating the RAW solid Square
 |
| understanding the makeup of the RAW solid square |
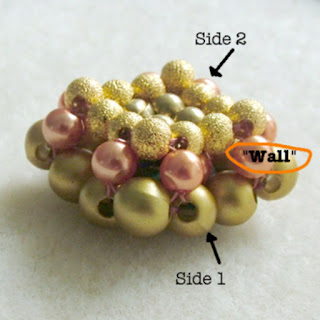
Note: I mentally call the Side View the "Wall" because it is like a vertical wall that holds the space between Side 1 and Side 2.
I am bringing your attention to the "Wall" (highlighted by the orange beads) because while it is easy to see the repeating RAW patterns in Side 1 & 2, it may be less obvious that the "Wall" is also made up of repeating RAW patterns.
Now let us go into the details of making a RAW solid square ...
How to Make a RAW Solid Square (Double Layered)
Without taking account of various colors at the moment, the beaded RAW square is:
- double layered
- made up of 2 different sized beads (e.g. 6mm & 4mm; or 5mm & 3mm; 4mm & 3mm, etc.)
Side 1: 16 larger beads (e.g. 6mm) - Side 2 (& Side View or "Wall"): 28 smaller beads (e.g. 4mm)
- extra long beading thread (if you, like me, like to have as little joining as possible. I normally work with thread 1+ meter to 2 meters).
NOTES:
- This piece requires multiple passes through the beads. So check on your needle sizes, threads, and bead holes before you start.
- If you use the 2-needle RAW approach, that will entail less passes through each bead.
 I have also used different colors so that you can better see how the RAW beaded square is constructed.
The orange beads (4mm) is used so you can see the "Wall" .
Laying out the beads before hand gives you a better ability to specify your colors should you so wish.
The layout also helps when you are bead weaving the structure.
TIP: If you take a photo (e.g. with iPad) of the layout, then you can easily reference the layout (and color placements) as you bead.
FYI: this piece can be done with a 2-needle approach. I chose to use the 1-needle approach as I find it much easier.
For Side 1 - make up the square with the RAW stitch. Start at the center (blue). End at the corner.
You should be able to easily see the repeating RAW patterns on this side.
Next we move on to making the "Wall" or sides. You can easily see how that too is made up of a RAW pattern. Just keep in mind as you continue that the orange bead constitutes the "Wall" and the star-dust (smaller) gold will make up the other square surround of Side 2.
This recognition will help as you continue to bead and create the "Wall".

When you complete the side "Wall", flip your piece around. Now we will complete Side 2.
 The inner square of side 2 (here) is made up of the smaller (4mm) bronze metal beads.
For additional clarity I have circled the 3 (star dust gold) beads which make up the 3 beads that will form a basic RAW block when joined to each of the inner bronze beads.
Now complete the inner RAW block with the smaller bronze beads.
Then join this inner bronze RAW block to the outer star-dust gold beads. Join all 4 corners of the inner RAW block.
Photos of the finished RAW Square
Important: You should keep your thread snug and taut when making this so that it is not all floppy - which is not what you want and it also makes the beading process less enjoyable. However no matter how carefully taut you keep your thread, you will find that you will need to bead through the beads on Side 1 & Side 2 to really tighten the entire object. Do this till you are satisfied or until you can no longer multi-pass through any of the beads.
Additional Notes on How to Make RAW Square
It is very useful if you know beforehand if you will be needing bail or ring connectors. If you do, and you want to have some jump rings attached - it is best to use closed jump rings so that it is secure. To do this, plan where you are going to have the ring connectors. Then during the phase of beading the outer square (side 1), you can include the closed jump ring so that when the whole thing is done up, the jumprings are seamless and securely integrated into the piece.Namaste! May all your right angle weaves work out just right for you!


