This Wassily02 Jacket is a knee length jacket, styled in the comfy, free size, Japanese boxy jacket style. As with the first of this series, Wassily01 Jacket (normal length), this too is based on one of Wassily Kandinsky’s art pieces and created using LC2C (Linked C2C) crochet.

(You can also view a full image gallery of finished item towards the end of the page.)
You can also use the standard C2C crochet to make this. If you are using my graphed pattern (links below) and the same yarn weight & hook size(s), then your resultant jacket may be a bit larger. That would not be a problem with a jacket like this.
You can find out how to crochet LC2C in my photo tutorial.

FYI: This time, the source of inspiration was from one, rather than multiple works by Kandinsky. I made a split and segmented abstraction of his “Cadence” for my design.
Basic Construction Info
This pattern is made of 7 separate pieces, worked in LC2C – excluding the bands (sleeves; neck/front):
• Back
• Front – x2 (each differently patterned)
• Sleeves – x2 (each differently patterned)
• Pockets – x2 (each differently patterned)


NOTE: You might notice that the final size does not fully correspond to the planned size, as per illustration. That is because,
• the gauge is only a (good) guideline. I have yet to produce an exact output-measurements based on Gauge-calculations.
• also the illustrations did not include the sleeve bands which I added separately.
Materials & Specifications
| Size: | Free Size (as per image shown above)
(Note: It is designated as “Free Size” which normally means will fit sizes Sm to Large or approximately (Aust) Size 8-14) |
|---|---|
| Crochet Terminology: | American & Crochet Symbols |
| Yarn: |  mainly Heritage Mills & Creative Corner SuperSoft (from OzYarn)
Tip: can substitute with any yarn with recommended needle size of 4.5 to 5 mm |
| Manufacturer's Recommended Needle/Hook Size: | 4.5 - 5mm |
| Number of Colours: | 19 |
| Hooks Used: | 3mm (note: smaller than the yarn’s recommended size) 3.5mm & 4mm (for bands around sleeves, front & neck) |
| Crochet Technique/Stitch: | No-Hole C2C (aka, holeless C2C, or Linked Corner to Corner) |
| Graph sizes (in squares): | (please refer to graphs in pattern) |
| Final Size: | as above |
| Final Nett Wt (approx.): | 1.8kg |
| Work Time (approx.; excl. prep & graphing): | 140 hrs |
| GAUGE (approx.) | [10×10 sq] = [17×17 cm ] or [10×10 cm] = [5.88 sq] |
| Status: n/a RLO (qted 2 kazo jul aug 2020; sold to Kbutler RL0 aug2020) ◊ | |
Wassily02 Knee Length Jacket - Preliminary Notes
 • This jacket is slightly flared. I used 3 different hook sizes to achieve this. The graphs and written colour counts have notations and/or markers to indicate when to change hook size. However …
you do NOT HAVE TO do this. The flare was not significant enough to make a huge difference in the end. I recommend you just use the smallest hook size (3mm) of the 3 sizes I used and just work the jacket with the “flare” If you do want to try making the “flare”, then just follow along as I have marked in the graphs and text.
Tip: if you choose to do so, I suggest you temporarily “colour” your hooks as I have done here, using colours that correspond with the colour markings I used in the pattern.
Tip: doing a gauge will help to give you a rough estimate how close you will be.

WORK SEQUENCE (Summary)
This is just my sequence of work which you might find helpful. But you can do it in any sequence you think will work best for you.
1. Fronts: Left and Right (can start with either). Left and Right as when you are looking at the pattern/printout; not when the garment is on the body.
2. Sleeves: Left and Right (can start with either)
3. Back
4. Pockets: Left and Right (start with either)
5. Neaten All Edges: sc
6. Attach Pockets to Fronts
7. Sleeve Seams – sew up
8. Sleeve Bands – work bands (if you are making bands)
9. Shoulder Seams – sew up
10. Front/Neck Bands – at least 4cm banding
11. Side Seams – mark sleeve openings. Sew up.
12. Sleeves to Body - sew
13. (opt) Finish-neaten bottom hem
WIP Steps & Photos
Tip: If you have purchased my (graphed) pattern, you can use these WIP photos to verify your progress.


Neatening Edges & Making Pockets (x2. Optional)
Once all the pieces are complete, I usually neaten all the edges. This makes it much easier to join pieces together and gives a much neater join.
Pockets are optional. Not everyone loves pockets. I do. So I have added 2 pockets with slanted top edges. The pockets are also worked in LC2C. If you are working in C2C, then continue by working the pockets in C2C. (Graphs for pockets are also provided in the paid pattern).

For the slanted, straight pocket edge, please refer to how to get a slanted, diagonal edge in LC2C or C2C crochet work.
The photos below continue in the assumption that you have already made the pockets (from the pattern’s graph) and with straight diagonal edges, as per how-to link above.
If you have chosen to work in a flare to the jacket, then your pockets will also be affected. The graphs for the pockets also come with colour differentiation (blue & yellow) to indicate where to change hook sizes. This will also be so marked in the text colour-count.
If you are not working in a flare to the jacket, then just carry on all work with the smallest hook. No need to change hook sizes.
The photos show how I neaten the edges and how the pockets are, as invisibly as possible, attached to the garment.


 As much as possible, try to match the colours of the pieces († cd11)


Sleeve Bands (optional)
You can end off the edging on the sleeve in whichever way you like. You can also choose to have a thick sleeve band (in any method/design), or none at all. The look and length will be up to you.
If you are not making a sleeve band, you can just join the sleeve seams (I used the Raised Chains Join method for joining all seams in the jacket.), neaten edges, and your sleeves are done.
I have gone with sleeve bands. I have used Overlay Mosaic Crochet and a pattern from Barbara Walker’s Mosaic Knitting book to create the sleeves band.
- join sleeve seams
- count number of stitches around sleeve (to be able to choose a pattern from Mosaic Knitting book)
- use Overlay Mosaic Crochet with selected pattern


Front Bands & Neck Bands

This band should be around 4cm in width. You can choose to make a band in whatever crochet stitch you like.
Here, again I chose to do it in Overlay Mosaic Crochet because that will give me a fairly firm band. And also gives me a chance to try out another patterned design from the pattern collection in Barbara Walker’s Mosaic Knitting book.
For the Front & Neck Banding, I used:
• 2 different hook sizes (to correspond with the flared body; otherwise just use the smallest hook size – 3mm)
• different yarn colours
• Mosaic Knitting/Crochet pattern; again from Barbara Walker’s Mosaic Knitting book
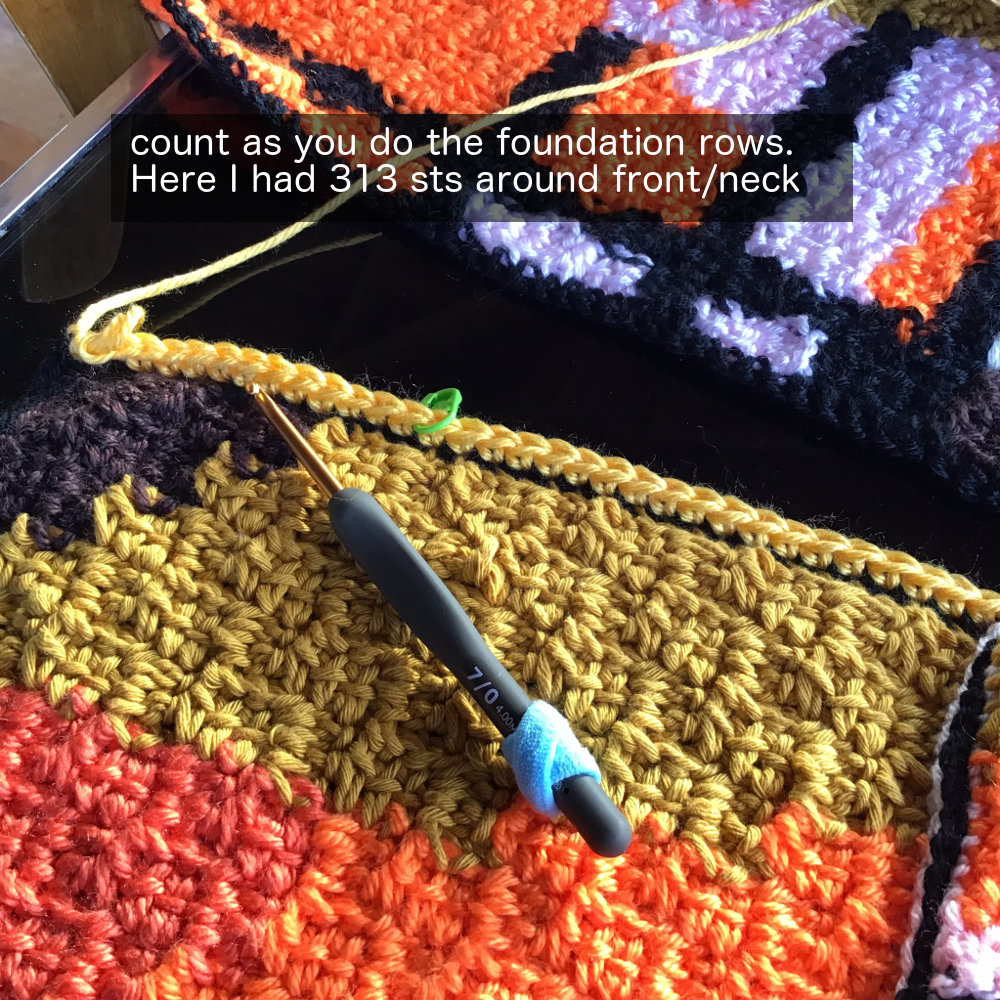
The Mosaic Crochet pattern I chose was in part determined by the number of stitches I picked up around the front and neck. More on this below …


Finishing the Bottom Edge (optional)
Okay, this is definitely optional. I am just a bit pedantic when it comes to finishing!


Wassily02 Japanese Boxy-Style Knee Length Jacket (slightly flared) – Finished
Yes, sorry .. heaps of photos. I guess you could say I was quite happy with the end results!!!


Pattern Now Available
Please note that the pattern is not a tutorial. The listed pattern will consist of:
• C2C graphs, with diagonal lines and colour count indicators (at 300-600dpi; suitable for print outs)
• written colour count for C2C work
• explanatory notes for how to best use the graphs and written colour count
• useful links to other optional how-tos & tutorials if you want them