Finger Crochet is crocheting with your fingers; no crochet hook needed. I love the finger crochet cord because they are very versatile and has, to me, a intriguing and professional finish.

Finger Crochet Cord – How To
I found this technique from my first crochet book. I was 10. And it took me a few decades before I came to it and finally got round to making my first finger crochet cord. The book was entirely in Japanese. I don’t read Japanese. So my term “finger crochet cord” is something I coined out of necessity.

Step-by-Step Instructions on how to Finger Crochet a cord
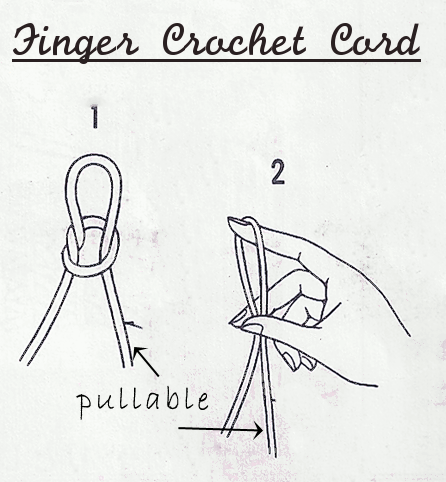
Make sure you have at least 3 times the desired end length of the cord. Then make a standard loop to start (as you would when you start to crochet). Having one pullable end (the 3x extra length) is core to the finger crochet cord technique.
Tip:
The starting slip know should be made loosely. You can tighten later after you have made a few stitches.
Tip:
The starting slip know should be made loosely. You can tighten later after you have made a few stitches.


A Beaded Example
Finger crochet cord (which, at times I refer to as hand crochet cord) can be done with or without beads; with beads on one edge or both edges.
An example of beaded cord done with finger crochet and Swarovski bicone crystal beads (CH0296: Mix & Match Necklace and Bangles)

