How to Wire Netting Cabochon with Connection Points is a supplement to the more basic Wire Netting: How to Wire Net Bezel a Cabochon. In this article, I will concentrate more on adding connection points during the wire netting cabochon process.
"Connection Points" here are the closed jumprings I have incorporated during the wire-netting process so that they will provide me with easy and secure points of connections which I can use to join to other components in the design process.

Why Would you want Connection Points?
This photo here shows how the wire-netted cabochon has been used. The connection points were essential as linking junctions for the design in the Labradorite Necklace.
So assuming you have read and/or know how to wire net a cabochon, I will carry on with this supplement.
It is best to have some sketch to guide where you place your connection points. It is not full proof (as designs tend to take a life of their own!) but it is virtually indespensable.
So assuming you have read and/or know how to wire net a cabochon, I will carry on with this supplement.
It is best to have some sketch to guide where you place your connection points. It is not full proof (as designs tend to take a life of their own!) but it is virtually indespensable.
How to Wire Net Cabochon with Connection Points
Use a strong, (semi) hard wire to create the frame that approximates the size of the cab.Here I have used 21 gauge non-tarnish Silver Wire for the frame. I decided that this frame will be on the front. This forms the base from which you will start the wire netting. I have twisted the wire for decorative purposes. (Square wires are great for this!)
After you have the frame, work harden it. I pounded it with a rubber mallet on thick leather to avoid marring the wire.
Start the wire netting by securing where the wires of the frame meet. Use a thinner wire for the wire netting (28-30 gauge).
Where you place your connection points will depend on your design.
Here I have completed the first round of wire netting. I will be placing the connection points (using closed jump rings) on the second row of wire netting. Use the sketch (with the connection points clearly marked) to guide the placement of the (soldered) close jump rings.
Here I have completed the first round of wire netting. I will be placing the connection points (using closed jump rings) on the second row of wire netting. Use the sketch (with the connection points clearly marked) to guide the placement of the (soldered) close jump rings.
The next photo shows row 2 of the wire netting completed.
All the rings have also been added.
All the rings have also been added.
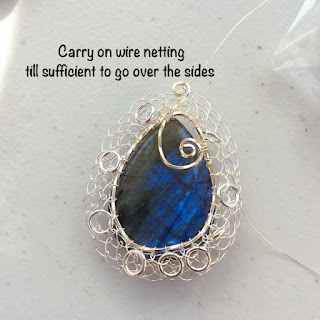
Then carry on with the wire netting cabochon until it is sufficient to go snugly and comfortably over the sides of the gemstone.
Wrap around the sides, flip to the back.
Wire net another row (tightly) on the back to secure the gemstone.
Here I have worked 3 rows (one over the other) to fully tighten and secure the gemstone.
Here I have worked 3 rows (one over the other) to fully tighten and secure the gemstone.
That’s it! A wire net cabochon with connection points.
Check out the Labradorite Necklace to see this component in use.
Check out the Labradorite Necklace to see this component in use.


